Wednesday, April 13, 2016

Soapy artist discovery - Kazumi Kinoshita of Aromatica Labo

All photos by Kazumi Kinoshita

Thanks to the wonders of Pinterest, today I was introduced to the incredible artistry of Kazumi Kinoshita in Japan.  From what I gather on her site, called Aromatica Labo, she is a soap teacher in both glycerin and cold process forms.  As you can see from the photos from her Pinterest page above, she has a huge range of styles and techniques.  It's just amazing!

Her site is in Japanese and the translations are not perfect, so I just want to share some of her photos with you.


I love how she uses the softest colors, and the addition of some texture.  Such a beautiful use of light in her soaps!


I am so in awe of her color combinations!  It's like a painting!


And then there's this, which I have no idea about!  All I know is that it makes me happy to look at!

The amazingness goes on and on.  You must see for yourself!  Start with her Pinterest page.  It's breathtaking!!


For all of Soapylove’s tutorials and class projects, go to www.soapylove.com or check out the book on Amazon!

Friday, April 1, 2016

Studio DIY Blog Crush, Ombre Inspiration, and Free Soap Tutorial!


Kelly, of Studio DIY
If you’ve been visiting the Soapylove Facebook page lately, you know that I’ve been seriously crushing on the DIY Studio blog!!  The tag line is “Make Life a Party.”  Say no more, right?!  Kelly, the adorable woman behind the blog, has incredible tutorials and stylish inspiration.  I could go on and on.  But you should check it out and get on her super fun mailing list.  Your inbox will thank you!

Yesterday she posted a tutorial for DIY ombre glassware.  So pretty! 

DIY Ombre Glassware Tutorial

Which reminds me – you can get this beautiful faded effect quite simply in glycerin soap!  A tilt of the mold is all it takes.  In conjunction with The Nova Studio, here is the Soapylove Ombre Soap Tutorial.  Enjoy!  (And if you have any questions or comments, please post them below!)


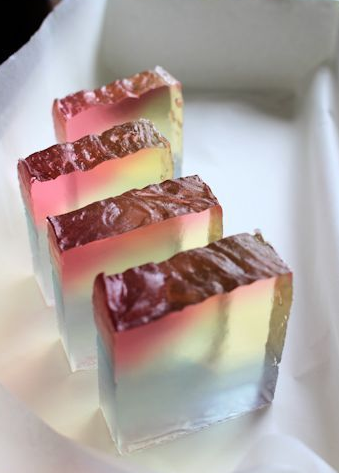
Free Ombre Melt and Pour Soap Tutorial
It’s so fun when a fashion trend translates perfectly into glycerin soap crafting! Like the “ombre” effect, which is a pretty color fade that is being used in everything from dip dyed shorts to hair color effects. Getting a perfect fade in soap might seem tricky, but with a simple technique you’ll get gorgeous results every time.
I see these soaps as a very elegant wedding or bridal shower favor, or a pretty way to add color to enhance your fragrance choice. This is also a handy technique to add to more complex designs!
Supplies: Makes 4 bars
·         4 oz of clear soap base, cut roughly into 1” cubes
·         12 oz of white soap base, cut up
·         Pastel mica colorant of your choice
·         Fragrance oil of your choice
·         4 cavity soap mold (I used Milky Way guest rectangle)
·         Spray bottle with rubbing alcohol
·         Stir sticks, mini paper cups, 2 cup heat-proof measuring cup, microwave


First we will color a small amount of clear soap with mica powder. The powder must be dissolved before adding to soap or else it will clump. To do this, spray some alcohol in a small paper cup (about ½ teaspoon). Stir in a pinch of mica powder and stir well. Melt 1 oz of clear soap base. Pour into the cup of mica solution and stir well. For this effect, I suggest using less color than you think you should. A blush of color is what we’re going for.

Now spray the inside of your mold with alcohol. Pour just enough colored soap to coat the surface.
Next quickly tilt your mold and prop it up on something like a book or magazine. Not more than 1/2” tall.

The colored layer is so thin that you must be super careful that your white soap is not too hot. Melt 12 oz of white soap base. Stir in 1 mL of fragrance oil per bar of soap you are making. Allow to cool in cup until thickened, spray hardened soap in mold with alcohol, and top off with white soap.
Allow soap to harden and unmold!
For all of Soapylove’s tutorials and class projects, go to www.soapylove.com!


Wednesday, March 30, 2016

How to Throw a DIY Glycerin Soap Making Party with Free Printables!

Follow my blog with Bloglovin


One thing I love about making glycerin soap is how easy and fun it is, for all ages!  I gathered up my friends and family for this video to show you how to host a soap crafting party.  As a bonus, I have included the printable signs and name tags to this post!  All you need is a crock pot and a freezer, plus supplies (which you can find in the soap section of most craft stores).

One thing that really tickles me when people make soap is how magical it seems!  From stirring in the color and watching it swirl into the soap, to choosing fragrance (which is a very personal decision!), and then the fun of popping a soap out and admiring their work.  The whole process is exciting and entertaining (as you'll see with my friend Alison)!

Get everyone outside and make something useful and creative.  For the full instructions, check out Let's Get Soapy which includes your supply list and ideas for party themes.  From birthdays to bridal showers, this party idea will make you the hostess with the mostess!

https://drive.google.com/file/d/0BzG2S5d-EptRdEdEVlpueGxGQWc/view?usp=sharing

Find all of Soapylove's eZines and tutorials at www.soapylove.com!

Creative Pop Love by Adrian & Gidi

Paper Art by Adrian & Gidi

I came across this awesome little gif on Pinterest and just had to share!  My love of pops goes well beyond soaps (as you can see on my Pop Love Pinterest board), and this really tickled me!  Hope you enjoy it, too.

Have a great day!
P.S. Go to Adrian & Gidi for more amazing paper art!

For all of Soapylove's eZines and tutorials, check out soapylove.com!

Monday, March 28, 2016

Bleeding soap colors - what to do?

So pretty, but why won't those colors last?
Do you love those bright, clear colors in glycerin soap? I sure do, but they have their limits! A Soapyfan just learned about one of them and wrote to me:
I was wondering if you might help with suggestions to keep layers from bleeding. I tried the layered pops but after a few weeks it looked horrible. I would love to get those beautiful clear layers without it turning out to be an awful mess.
Sadly, I know exactly what she means. When I made this rainbow soap, I had just ordered an assortment of Labcolors and wanted to use every shade in every soap I made! The colors were so gorgeous and the clear colors were beyond lovely. I even took a picture right away (the one above), posted it on Etsy, and sold a whole bunch right away. I was so excited!

But lo and behold, a couple of days later, I noticed my crisp layers were getting blurry. The colors were bleeding together! So here’s what I told her:
“Yes, the clear layers are beautiful but fleeting! I learned that the hard way, too, AFTER I had shipped a bunch out! Oops!! 
The trick to making the colors stick is using non-bleeding colors. There are two types of colorants - dyes and pigments. Dyes bleed (even some micas are dyed and the colors will bleed) or pigments which are colored powders that don't bleed. If you go to Soapqueen.com and search "non-bleeding colors" you will find several articles about them. Brambleberry is great about indicating on their colorant listings whether the color bleeds or not. https://www.soapqueen.com/bath-and-body-tutorials/tips-and-tricks/bramble-berrys-non-bleeding-colors/
I was determined to get clear colors even with nonbleeding colorants (which are typically opaque colors) so I tested many methods and wrote an article about how to do it here: https://thenovastudio.com/product/soapylove-ezine-issue-9/
One more thing - dyes fade in the sun! So if you put out soaps using dyes at a craft fair (even in the shade!) they will fade right before your eyes!
I hope that helps!
Happy soap crafting!”
I hope that is helpful to you, too. I love helping soap crafters so email me at dchialtas@gmail.com or message me anytime! Thanks and have a great week!

-Debbie


Find the Soapylove book only via Amazon!

Friday, September 11, 2015

Radiating Stripes Soap Tutorial Using Lego Bricks

Glycerin soap is an amazing medium for creating layers.  I always wanted to make a jaw-breaker soap but struggled with the process.  Then, a few years ago, Anne-Marie Faiola (the Soap Queen), was working on a layers theme post for the Bramble Berry blog and invited me to contribute a soap design.
At the time, my son was enjoying Legos (using my Legos that my mother lovingly kept), and I realized how amazing these plastic building bricks would be to build a soap mold!  Leak proof, heat resistant, and totally modular! Although this project requires a lot of time, it's not difficult.  Simply create a tiny square then embed it, building layer upon layer, rebuilding your mold as you go.  Although cutting into it is a tad nerve-racking, the thrill of seeing the layers is worth the effort!!  Here's the visual graphic, and the steps are beneath.  Come to my Facebook page to discuss or show off your version!


1. Set up first cavity, making walls enclosing 4 raised dots (or a "2x2"). Make walls 3 bricks high. You will only fill to 2 bricks high to make a cube.

2. Fill to top of 2nd brick with white soap. Allow to harden, then break walls to release white cube.

3. Trim bottom of soap to remove dot indentations.

4. Build next box enclosing 3x3 dots. Walls should be 4 bricks high. Fill with 2nd color to 1/2 brick high. Let harden. This will be the floor your white cube will sit on.

5. Put in white cube. Spray with alcohol and top off with 2nd color, to 3 bricks high.

6. Here's what it looks like with the white cube covered in red soap.

7. Break walls, pulling bricks off of soap.

8. Trim off these lego indentations.

9. Trimming...

10. Repeat and repeat, every time making your box 1 row wider and taller.

11. Here is my almost finished cube. It is 5 layers thick.

12. My last layer is white.

Main photo:  Here's the finished soap, all cut up into neat angles to show the layers.

Tip: Make sure to use non-bleeding colorants!! You don't want those gorgeous layers to go fuzzy on you.  Also, use a really sharp heavy knife to cut it up - a thin knife may bend and throw off your cut. 

Idea: wouldn't this be a fun way to make some Tetris inspired soaps?  No layers required!!  

Have fun everyone!
-Debbie

(Would you like more Soapylove projects?  Head to soapylove.com for the entire library!)

Thursday, August 6, 2015

Buy in Bulk! Get the whole library of Let's Get Soapy for a special price!

Lori and Cassie at The Nova Studio are always thinkin'. Since we all noticed that the interest in melt and pour soap is on the rise and people are discovering how awesome soap crafting is, they decided to put the entire Let's Get Soapy eZine Collection into one bundle, and save you a bundle!  

Each issue has 3 full step-by-step tutorials (many with great holiday and gift ideas), supply articles, technique ideas, design inspiration, and often some extra goodies like printables, you will get a lot of great information in these eZines.  Designed to be read on your monitor, you'll be able to dive in the moment these digital magazines hit your inbox.  

Check it out!  I think you'll love it!